
thebeautifullifeofthegirlnextdoor.blogspot.com.
If you haven't seen her blog already please check it out cos she's got some amazing makeup looks to share. So a couple of weeks ago starryskies created a gorgeous look based on this beautiful picture of a kingfisher and I was so inspired I had to do one too. So here it is with a picture tutorial to boot :D
Here's the original picture...

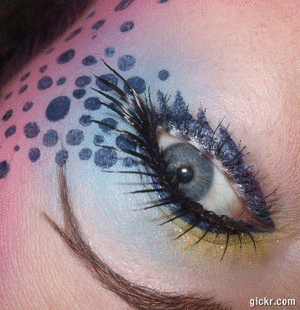
and here's my look. If you'd like to know how to create this look please keep reading...

First tape off your eye and cover the lid with NYX Jumbo pencil in Milk. Then apply Mac Painterly Paint pot up to the brow and blend...

Pat a metallic yellow onto the lid, leaving a small amount of white next to the tear duct...
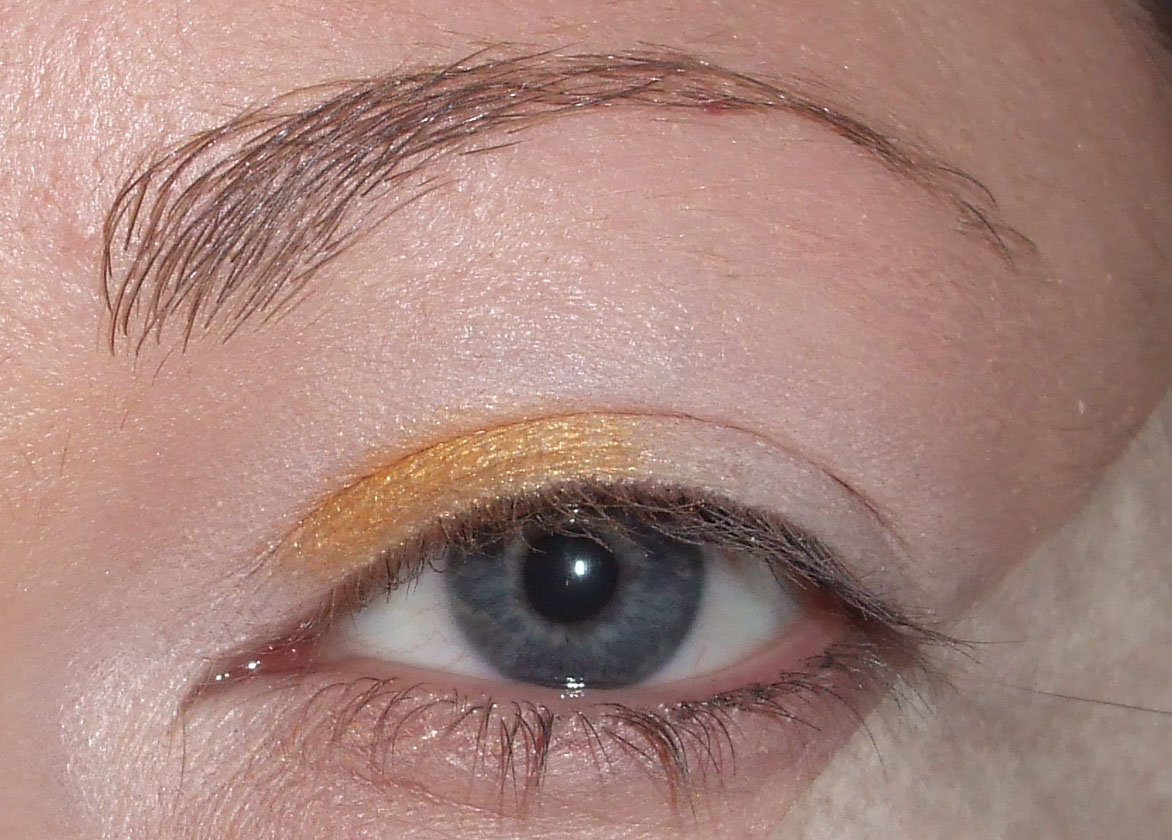
Working towards the outer lid, pat on a mid orange colour next to the yellow. I'm using colours from the Coastal Scents Metal Mania palette...

Next apply a darker orange from the same palette and work out towards the tape. Make sure all three colours are blended across the lid...

Using Mac's Paparazz-she apply colour to the crease and work back towards the inner eye...

Next use Mac's Spectacle of Yourself to define the outer V...

Apply NYX Jumbo Pencil in Milk below the brow, and to the tear duct area...

Blend this out and apply a small amount of Mac's Tweet Me along with Mac's Vanilla. Remove the tape...

Using Mac's Black Track line the upper eye, creating a wing on the outer edge...

Using the same product line the water line and create a second wing. Apply some of the yellow shadow to the inner lower lash line. Use Spectacle of Yourself for the outer lower lash line...

Then apply Mac's Liquidlast in Aqualine along the whole of the lower lash line and fill in your brow...

Next add a couple of coats of mascara. I'm using Bourjois Clubbers Extreme...

Use NYX Jumbo Pencil in Milk to define the area between the two wings and if you don't want to go any further your look is now complete...

But if your like me and want a bit of drama add some false lashes!! I'm using Girls Aloud Festival Lashes. No surprises there ;)

Now the look is done!!

Thanks for looking, hope you like it!! Let me know if you'd like to see more tutorials...
Speak soon xx


.JPG)


starryskies214 was a beautiful one... yours is also so goood!!! Love the lashes and i love that teal colour on the lower lash line!
ReplyDeleteThat's very nice.
ReplyDeleteI love that you did a tutorial! I'm going to have to do it sometime! It's so beautiful!
ReplyDeleteI really love this one. Used to wear orange eye makeup in the 80s, reckon I can break it back out again now!!! Fab look, really stunning xxx
ReplyDeleteThanks for the comment Mandy! Glad you like the look, I certainly had some big shoes to fill!! I love Starryskies work :D
ReplyDeleteThanks Charlotte Sparkle! I really appreciate the comment :D
Starryskies glad you like the look!! You defo need to do tutorials, that would be amazing!
Shaz you should definitely break out the orange haha! I'm adicted, I LOVE IT!!! I don't know whats up with me...everything I do has orange in it lately xx
This is so beautiful!!! Love the lashes tooo!!
ReplyDeleteAww Thankyou sooo much!! :D
ReplyDelete